31 May 2011

Absurdly Decadent Cupcakes


How is is possible to make a chocolate ganache cupcake even more sinfully delicious? Just add salted caramel and potato chips. Yes, potato chips. I was reading an email from Portland Monthly about Portland's microbakery and noticed these little treats. I had to make them, oh yes, I had to make them. 

I started with the Cook's Illustrated recipe for chocolate ganache cupcakes.
Fresh out of the oven

A close-up of just how moist and chocolatey these suckers are

Then took a handful of Lay's Wavy potato chips and dipped them in the chocolate buttercream frosting I made (ran out of pure chocolate), and threw on a sprinkle of kosher salt for good measure.
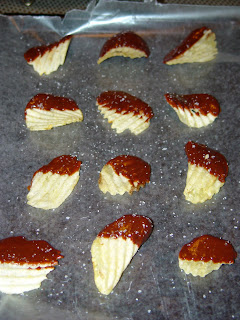
Good idea to let these cool on wax paper so you don't lose the chocolate
Then I made a classic caramel with some salt in my other liquids (seen above), which was then finished off with some grey sea salt I discovered after putting salt on the chips. Sigh...my cabinets will never be completely organized.
Don't take your caramel off the stove before it turns a nice,
deep amber color or it'll lack the depth of flavor you want
Once cooled, I then frosted my cupcakes with chocolate buttercream frosting.
Before they go completely overboard
I jammed in the potato chips. I put in some non-frosted ones for good measure.
Little cupcakes waiting for the caramel storm
Drizzle the caramel over the cupcakes once it has cooled down a bit and serve!
Probably a good idea to do this over the wax paper or something you can throw away
This is just absurd...but delicious.
Even two days after baking these, the cupcakes are still moist
For those of you not able to purchase one at Sugarcube in Portland, here are the recipes I used.

Ultimate Chocolate Cupcakes with Ganache Filling
From Cooksillustrated.com
Use a high quality bittersweet or semisweet chocolate for this recipe, such as one of the test kitchen's favorite baking chocolates, Callebaut Intense Dark Chocolate L-60-40NV or Ghirardelli Bittersweet Chocolate Baking Bar. Though we highly recommend the ganache filling, you can omit it for a more traditional cupcake. The cupcakes can be made up to 24 hours in advance and stored unfrosted in an airtight container.

INGREDIENTS
Ganache Filling
2 ounces bittersweet chocolate , chopped fine (see note)
1/4 cup heavy cream
1 tablespoon confectioners' sugar
Chocolate Cupcakes
3 ounces bittersweet chocolate , chopped fine (see note)
1/3 cup (1 ounce) Dutch-processed cocoa
3/4 cup hot coffee
3/4 cup (4 1/8 ounces) bread flour
3/4 cup (5 1/4 ounces) granulated sugar
1/2 teaspoon table salt
1/2 teaspoon baking soda
6 tablespoons vegetable oil
2 large eggs
2 teaspoons white vinegar
1 teaspoon vanilla extract
1 recipe Frosting

INSTRUCTIONS
1. FOR GANACHE FILLING: Place chocolate, cream, and confectioners sugar in medium microwave-safe bowl. Heat in microwave on high power until mixture is warm to touch, 20 to 30 seconds. Whisk until smooth; transfer bowl to refrigerator and let stand until just chilled, no longer than 30 minutes.
2. FOR CUPCAKES: Adjust oven rack to middle position and heat oven to 350 degrees. Line standard-size muffin pan with baking-cup liners. Place chocolate and cocoa in medium bowl. Pour hot coffee over mixture and whisk until smooth. Set in refrigerator to cool completely, about 20 minutes. Whisk flour, sugar, salt, and baking soda together in medium bowl; set aside.
3. Whisk oil, eggs, vinegar, and vanilla into cooled chocolate-cocoa mixture until smooth. Add flour mixture and whisk until smooth.
4. Divide batter evenly among muffin pan cups. Place one slightly rounded teaspoon ganache filling on top of each cupcake. Bake until cupcakes are set and just firm to touch, 17 to 19 minutes. Cool cupcakes in muffin pan on wire rack until cool enough to handle, about 10 minutes. Carefully lift each cupcake from muffin pan and set on wire rack. Cool to room temperature before frosting, about 1 hour.
5. TO FROST: Mound 2 to 3 tablespoons frosting on center of each cupcake. Using small icing spatula or butter knife, spread frosting to edge of cupcake, leaving slight mound in center.

Easy Caramel Sauce*
From Cooksillustrated.com

INGREDIENTS
1/2 cup water
1 cup granulated sugar
1 cup heavy cream
1/8 teaspoon table salt
1/2 teaspoon vanilla extract
1/2 teaspoon lemon juice from 1 lemon
1 teaspoon high quality salt

INSTRUCTIONS
1. Place water in heavy-bottomed 2-quart saucepan; pour sugar in center of pan, taking care not to let sugar crystals adhere to sides of pan. Cover and bring mixture to boil over high heat; once boiling, uncover and continue to boil until syrup is thick and straw-colored (syrup should register 300 degrees on candy thermometer), about 7 minutes. Reduce heat to medium and continue to cook until syrup is deep amber (syrup should register 350 degrees on candy thermometer), about 1 to 2 minutes.
2. Meanwhile, bring cream and salt to simmer in small saucepan over high heat (if cream boils before sugar reaches deep amber color, remove cream from heat and cover to keep warm).
3. Remove sugar syrup from heat; very carefully pour about one quarter of hot cream into it (mixture will bubble vigorously), and let bubbling subside. Add remaining cream, vanilla, and lemon juice; whisk until sauce is smooth. (Sauce can be cooled and refrigerated in airtight container for up to 2 weeks.)

*I halved this recipe and had more than enough to cover the cupcakes. Make sure to use the smallest pot you have or the water will evaporate too fast.

24 May 2011

The Mac and Cheese Off

The gloves came off last weekend and a showdown was had the Rice house...Baked mac versus Stovetop mac. Which would prevail?

I used Steve's Famous Macaroni and Cheese for the baked version, and Eve-Maridy found a creamy stovetop mac from the Food Network's Alton Brown. Since we had the showdown on a Friday right after work and baked mac can take some time, I prepared mine up until the baking part and stuck it in the freezer. I also made breadcrumbs out of leftover Little T focaccia we had from earlier in the week and integrated the chili powder that way.
Eve-Maridy's creamy mac
My baked mac
Two things were discovered from this challenge. One--the two types of mac are WAY too different to really declare a clear champion. Mine with its crispy crust and four types of cheese were nothing like her super creamy, sharp cheddar goodness...each bite made me want to pick a different winner. Two--despite my effort to bring the partially made dish of mac to room temperature before sticking it in the hot oven, there were some cold parts in the middle. The top was divine--so bubbly, melty, and crunchy. The middle made me cringe. It was by far NOT my best work (sorry Steve-o). So, I suggest not only letting it come as close to room temperature as possible, but also covering it with aluminum foil for the first 20 minutes of baking, then removing the foil for an additional 20-25 minutes until crisp. Sad it wasn't my best effort, but it was still a delicious night with great friends!
Creamy and baked coexisting peacefully
To top it all off, I made a skillet apple pie (now THAT turned out perfectly), and we watched Behind the Mask: The Rise of Leslie Vernon (filmed right here in Portland, Oregon!).
Skillet apple pie right out of the oven
Even better with some ice cream
Perfect ending to a great night

Skillet Apple Pie
by Cook's Illustrated
SERVES 6 TO 8
If your skillet is not heatproof, precook the apples and stir in the cider mixture as instructed, then transfer the apples to a 13- by 9-inch baking dish. Roll out the dough to a 13- by 9-inch rectangle and bake it as instructed. If you do not have apple cider, reduced apple juice may be used as a substitute—simmer 1 cup apple juice in a small saucepan over medium heat until reduced to 1/2 cup (about 10 minutes). Serve the pie warm or at room temperature with vanilla ice cream or whipped cream. Use a combination of sweet, crisp apples such as Golden Delicious and firm, tart apples such as Cortland or Empire.

INGREDIENTS
Crust
1cup unbleached all-purpose flour (5 ounces), plus more for dusting work surface
1tablespoon sugar
1/2teaspoon table salt
2tablespoons vegetable shortening , chilled
6tablespoons (3/4 stick) cold unsalted butter , cut into 1/4-inch pieces
3–4tablespoons ice water
Filling
1/2cup apple cider (see note)
1/3cup maple syrup
2tablespoons fresh lemon juice from 1 lemon
2teaspoons cornstarch
1/8teaspoon ground cinnamon (optional)
2tablespoons unsalted butter
2 1/2pounds sweet apples and tart apples (about 5 medium), peeled, cored, halved, and cut into 1/2-inch-thick wedges (see note)
1 egg white , lightly beaten
2teaspoons sugar

INSTRUCTIONS
1. FOR THE CRUST: Pulse flour, sugar, and salt in food processor until combined. Add shortening and process until mixture has texture of coarse sand, about ten 1-second pulses. Scatter butter pieces over flour mixture and process until mixture is pale yellow and resembles coarse crumbs, with butter bits no larger than small peas, about ten 1-second pulses. Transfer mixture to medium bowl.
2. Sprinkle 3 tablespoons ice water over mixture. With blade of rubber spatula, use folding motion to mix. Press down on dough with broad side of spatula until dough sticks together, adding up to 1 tablespoon more ice water if dough does not come
together. Turn dough out onto sheet of plastic wrap and flatten into 4-inch disk. Wrap dough and refrigerate 30 minutes, or up to 2 days, before rolling out. (If dough is refrigerated longer than 1 hour, let stand at room temperature until malleable.)
3. FOR THE FILLING: Adjust oven rack to upper-middle position (between 7 and 9 inches from heating element) and heat oven to 500 degrees. Whisk cider, syrup, lemon juice, cornstarch, and cinnamon (if using) together in medium bowl until smooth. Heat butter in 12-inch heatproof skillet over medium-high heat. When foaming subsides, add apples and cook, stirring 2 or 3 times until apples begin to caramelize, about 5 minutes. (Do not fully cook apples.) Remove pan from heat, add cider mixture, and gently stir until apples are well coated. Set aside to cool slightly.
4. TO ASSEMBLE AND BAKE: Roll out dough on lightly floured work surface, or between 2 large sheets of plastic wrap, to 11-inch circle. Roll dough loosely around rolling pin and unroll over apple filling. Brush dough with egg white and sprinkle with sugar. With sharp knife, gently cut dough into 6 pieces by making 1 vertical cut followed by 2 evenly spaced horizontal cuts (perpendicular to first cut). Bake until apples are tender and crust is a deep golden brown, about 20 minutes. Let cool 15 minutes; serve.

17 May 2011

Beef Rolls with PICKLES!

Since last week I had such success with a Lidia recipe, I thought I'd try another one this week. Since New Seasons has taken down their online shopping tool (boo) that I used to plan our shopping trip each week, I have had to play it safe with our shopping list, as well as make more decisions in the grocery store (dangerous). I saw this recipe for beef rolls with mustard and vegetables on Lidia's Italy months ago and immediately fell in food lust. However, unless the stars align and I'm magically in the middle of planning our meals on Sunday afternoon (never happens) when I watch her show, I forget about it and go on lusting in the back of my brain where the index of all the recipes I want to try are filed. I managed to recall the information as I mapped out our dinners for the week and made plans for it to be our Sunday meal.

These rolls are pretty simple to make once you get past the meat cutting part. A butcher I am not. Here is a short compilation of the rookie mistakes I made....

Cutting the meat with the grain
D'oh! I knew I was supposed to cut against, but got so disheveled when trying to figure out how to approach the big slab of beef that I am pretty sure I cut with it. Not the end of the world, but it did make things a little tougher than they should've been.

Not drying off the meat enough
I didn't really do much to prepare it to be browned, like take a paper towel to each one and make sure it was nice and dry.

Overcrowding the pan
Another d'oh! I noticed that they were looking a little big to all fit in my usual pan (you need a lid for this one as they simmer on the stovetop for over an hour), so I pulled out the gigantic dutch oven...except it wasn't big enough. Instead of doing them in batches and then nestling them all in for the final simmer, I pushed it and tried to brown them all at once. Problem with this, for those who didn't know not to crowd the pan, is that it lowers the temperature of the oil too much thus making it hard to brown your meat.

Despite my little errors, they still turned out pretty good. At first taste, it has a beef stew-type flavor, but then you get the tang of the pickle and mustard and it ends on a completely different note. I will probably try to make this again and hopefully avoid my rookie mistakes.

Best thing about this recipe...gets better with time. I had leftovers for lunch today and it was so much more flavorful and tender than when I first made it.

Mmm...meat

Vegetables all cut up and my recipe ready to go

Ready for rolling

Secure with a toothpick....and try not to use colored ones (the only ones we had) because they tend to leave a little decoration behind

Light dusting of flour--make sure to shake off excess flour

Steamy...too steamy. Overcrowded pans lead to less than perfectly browned meat

Had to cook my veggies separate, but still scraped up all the browned goodness

Finished product! Serve with something that can sop up that delicious gravy. I was supposed to make spaetzle, but got lazy. Ciabatta from New Seasons works too


Beef Rolls with Mustard and Vegetables*
(Involtini di Manzo alla Senape)
by Lidia Bastianich

2½ pound boneless bottom-round rump roast
1 teaspoon kosher salt
2 tablespoons German style mustard
2 large stalks celery, cut in 2x4 inch sticks
2 medium carrots, cut in 2x4 inch sticks
12 small dill pickles, (about 2 inches long)
½ cup all-purpose flour
1 large onion, sliced (about 2 cups)
2 bay leaves, preferably fresh
1 cup white wine
4 cups light stock, (chicken, turkey, or vegetable broth)

Lay one hand open on the top of the roast to hold it in place. With a sharp chef 's knife, begin slicing the meat on a slant, cutting across the grain, and continue with parallel angled cuts every 1/2 inch or so, slicing the meat chunk into a dozen thin scallops. As you slice, press down lightly with your top hand, creating resistance, so you can feel the blade moving and keep the slices evenly thick.

Flatten the slices into scallops one at a time. Place each one between sheets of wax paper or plastic wrap and pound it with the toothed face of a meat mallet, tenderizing and spreading it into a narrow oval, about 6 by 3 inches. When all are pounded, season the scallops with salt, about 1/2 teaspoon in all, and spread a thin layer of mustard on the top surfaces.

Starting at the short end of each scallop, pile three celery sticks, three carrot sticks, and a pickle in a bundle. Roll up the meat, enclosing the vegetables, and secure it with toothpicks. When all the rolls are formed, season with the remaining salt. Spread the flour on a plate, and dredge the involtini, lightly coating them.

Pour the olive oil in the pan, and set it over medium-high heat. Shake excess flour from the rolls, lay them in the pan in one layer, and cook, rotating and moving them around, until browned all over. Push the rolls to the side of the pan, and scatter the onion slices and any remaining carrot and celery sticks on the pan bottom. Drop in the bay leaves, and cook the vegetables, stirring occasionally, until they're beginning to brown and soften, about 5 minutes.

Turn the heat to high, pour in the white wine, and let it heat and bubble until almost completely evaporated. Pour in just enough broth to cover the involtini, and bring it to a boil. Set the cover ajar, and adjust the heat to keep the liquid simmering. Cook for an hour and 15 minutes, or until the beef is tender and the sauce has reduced to a consistency you like.Turn off the heat, take out the toothpicks, and remove the involtini to a warm platter. Ladle some of the pan sauce over the involtini, pour the rest into a bowl for passing at the table, and serve while hot.

*This recipe does not specify the amount of oil to be used for cooking the rolls. I used about 1/4 cup and that was a little much. Use enough to coat the bottom of your pan generously.

10 May 2011

Mother's Day Dinner

Past Mother's Days when I couldn't be home to celebrate with my mom, I had a tradition of celebrating with two of my friends whose mothers have passed away. I don't know how it got started, but it was nice to spend some time cooking for people I loved on a day set aside to honor the women who have done so much for us. This past Mother's Day we re-started the tradition (minus one friend and adding another) and I finally made a recipe from one of my favorite TV cooks, Lidia Bastianich.

There are about a million recipes I want to try and narrowing it down seemed like an already-impossible task. Since whole fryers were on sale, I started there. With about 20 chicken recipes listed, it was tough to pick one, but finally settled on Pollo Scarpariello. The recipe calls for two small fryers--about 2.5 lbs. each. Well, the smallest fryer at New Seasons was four lbs, so I went with it and supplemented with six more drumsticks. On the side we had simple risotto and lemon and pine nut green beans.
Brown chicken skin side down first

After browning all the chicken and sausage, add the (10!) minced cloves of garlic

Add your pickled cherry peppers, vinegar and white wine and scrape up those beautiful browned bits!

Add all of your meats, pour that sauce over and stick in the oven for 10 minutes

Add 1/4 cup of fresh, chopped parsley to the sauce, then pour over the chicken and serve

Sides of lemon and pine nut green beans and simple risotto

I think Lidia would be proud


Pollo Scarpariello
by Lidia Bastianich
(serves 6 VERY hungry people)

2 small fryer chickens, (about 2 1/2 pounds each)
salt
freshly ground pepper
¼ cup olive oil, or as needed
½ pound sweet Italian sausage, cut into 1-inch pieces*
10 garlic cloves, peeled and chopped fine
4 pickled cherry peppers, cut in half and stemmed**
¼ cup red wine vinegar
½ cup dry white wine
1 cup chicken stock, or canned reduced-sodium chicken broth
¼ cup Italian parsley, freshly chopped

Cut each chicken into 12 pieces. Wash and pat the chicken pieces dry, then season them generously with salt and pepper. Preheat oven to 475 degrees F. Heat 2 tablespoons of the olive oil in a large skillet. Add as many pieces of chicken, skin side down and starting with the leg, thigh and wing pieces, to the skillet as fit without touching. Cook the chicken, turning as necessary, until golden brown on all sides, about 8 minutes. Remove the chicken pieces as they brown and drain them briefly on paper towels. Place the drained chicken pieces in a roasting pan large enough to hold all of them in a single layer. Repeat with the remaining chicken, adding more oil to the pan as necessary and adjusting the heat to prevent the bits that stick to the pan from overbrowning. As room becomes available in the skillet after all the chicken has been added, tuck in pieces of sausage and cook, turning until browned on all sides.

Remove all chicken and sausage from the pan, add the garlic and cook until golden, being careful not to burn it. Scatter the cherry peppers into the skillet, season with salt and pepper and stir for a minute. Pour in the vinegar and bring to boil, scraping the browned bits that stick to the skillet into the liquid and cook until the vinegar is reduced by half. Add the white wine, bring to a boil and boil until reduced by half, about 3 minutes.

Pour in the stock and bring to a boil. Pour the sauce over the chicken in the roasting pan and stir to coat. Place the chicken in the oven and roast, stirring occasionally, until the sauce is thick and sticky, like molasses, about 10 minutes. If the sauce is still too thin, place the roasting pan directly over medium-high heat on the stovetop and cook, stirring, until it is reduced, about a minute or two. Once the sauce is thickened, toss in parsley and serve.

*The store didn't have sweet Italian sausage in casing, so I got the bulk and rolled them up into little meatballs. They were quite tasty that way and got nice and brown.
**I found the pickled cherry peppers in the bulk antipasti section at the store with the cheese. Although the recipe only asks for four of them, I totally would have put more in if I had known how delicious they would be!

06 May 2011

The Great Burger Debate

Last Friday Shawn and I finally checked out Foster Burger in SE Portland. I've been hearing about this place for ages and now that we live in SE, there's no excuse. I admittedly went into with very high expectations. I'm no expert, but I definitely know a good burger when I taste one. Overall, I was very satisfied and it was a tasty burger. Although enticed by the special Asian-themed burger of the day that was described to us as coming out looking like a Japanese pagoda, I had to go with the classic Foster burger for my first time. As I told Shawn, to me it was a really well-made version of a McDonald's type hamburger. Not that they are even in the same universe as far as quality, but it was a classic American hamburger right down to the creamy Thousand Island-esque sauce, although served on a brioche bun. Overall a good experience and we'll probably go back again at some point to try one of the specials (and get a shake this time!), but definitely not my favorite.

Pause burger, courtesy of Portland Hamburgers blog
Which brings me back to our all-time favorite burger at Pause. Granted I'm now a little biased, but there was a time when I had never been there and had no expectations. The in-house ground meat makes a difference, but I think it's the consistency in cooking it that seems to set it apart. The meat is flavorful and when you ask for a medium burger, you get a medium burger (medium rare in Shawn's case). There's nothing too fancy about it, but it just tastes good. I have yet to try the burger at Gruner, but I'm sure it's going to live up to its reputation given that everything else there has for me so far.

Which restaurant makes your favorite burger? What makes it so special?