10 May 2011

Mother's Day Dinner

Past Mother's Days when I couldn't be home to celebrate with my mom, I had a tradition of celebrating with two of my friends whose mothers have passed away. I don't know how it got started, but it was nice to spend some time cooking for people I loved on a day set aside to honor the women who have done so much for us. This past Mother's Day we re-started the tradition (minus one friend and adding another) and I finally made a recipe from one of my favorite TV cooks, Lidia Bastianich.

There are about a million recipes I want to try and narrowing it down seemed like an already-impossible task. Since whole fryers were on sale, I started there. With about 20 chicken recipes listed, it was tough to pick one, but finally settled on Pollo Scarpariello. The recipe calls for two small fryers--about 2.5 lbs. each. Well, the smallest fryer at New Seasons was four lbs, so I went with it and supplemented with six more drumsticks. On the side we had simple risotto and lemon and pine nut green beans.
Brown chicken skin side down first

After browning all the chicken and sausage, add the (10!) minced cloves of garlic

Add your pickled cherry peppers, vinegar and white wine and scrape up those beautiful browned bits!

Add all of your meats, pour that sauce over and stick in the oven for 10 minutes

Add 1/4 cup of fresh, chopped parsley to the sauce, then pour over the chicken and serve

Sides of lemon and pine nut green beans and simple risotto

I think Lidia would be proud


Pollo Scarpariello
by Lidia Bastianich
(serves 6 VERY hungry people)

2 small fryer chickens, (about 2 1/2 pounds each)
salt
freshly ground pepper
¼ cup olive oil, or as needed
½ pound sweet Italian sausage, cut into 1-inch pieces*
10 garlic cloves, peeled and chopped fine
4 pickled cherry peppers, cut in half and stemmed**
¼ cup red wine vinegar
½ cup dry white wine
1 cup chicken stock, or canned reduced-sodium chicken broth
¼ cup Italian parsley, freshly chopped

Cut each chicken into 12 pieces. Wash and pat the chicken pieces dry, then season them generously with salt and pepper. Preheat oven to 475 degrees F. Heat 2 tablespoons of the olive oil in a large skillet. Add as many pieces of chicken, skin side down and starting with the leg, thigh and wing pieces, to the skillet as fit without touching. Cook the chicken, turning as necessary, until golden brown on all sides, about 8 minutes. Remove the chicken pieces as they brown and drain them briefly on paper towels. Place the drained chicken pieces in a roasting pan large enough to hold all of them in a single layer. Repeat with the remaining chicken, adding more oil to the pan as necessary and adjusting the heat to prevent the bits that stick to the pan from overbrowning. As room becomes available in the skillet after all the chicken has been added, tuck in pieces of sausage and cook, turning until browned on all sides.

Remove all chicken and sausage from the pan, add the garlic and cook until golden, being careful not to burn it. Scatter the cherry peppers into the skillet, season with salt and pepper and stir for a minute. Pour in the vinegar and bring to boil, scraping the browned bits that stick to the skillet into the liquid and cook until the vinegar is reduced by half. Add the white wine, bring to a boil and boil until reduced by half, about 3 minutes.

Pour in the stock and bring to a boil. Pour the sauce over the chicken in the roasting pan and stir to coat. Place the chicken in the oven and roast, stirring occasionally, until the sauce is thick and sticky, like molasses, about 10 minutes. If the sauce is still too thin, place the roasting pan directly over medium-high heat on the stovetop and cook, stirring, until it is reduced, about a minute or two. Once the sauce is thickened, toss in parsley and serve.

*The store didn't have sweet Italian sausage in casing, so I got the bulk and rolled them up into little meatballs. They were quite tasty that way and got nice and brown.
**I found the pickled cherry peppers in the bulk antipasti section at the store with the cheese. Although the recipe only asks for four of them, I totally would have put more in if I had known how delicious they would be!

06 May 2011

The Great Burger Debate

Last Friday Shawn and I finally checked out Foster Burger in SE Portland. I've been hearing about this place for ages and now that we live in SE, there's no excuse. I admittedly went into with very high expectations. I'm no expert, but I definitely know a good burger when I taste one. Overall, I was very satisfied and it was a tasty burger. Although enticed by the special Asian-themed burger of the day that was described to us as coming out looking like a Japanese pagoda, I had to go with the classic Foster burger for my first time. As I told Shawn, to me it was a really well-made version of a McDonald's type hamburger. Not that they are even in the same universe as far as quality, but it was a classic American hamburger right down to the creamy Thousand Island-esque sauce, although served on a brioche bun. Overall a good experience and we'll probably go back again at some point to try one of the specials (and get a shake this time!), but definitely not my favorite.

Pause burger, courtesy of Portland Hamburgers blog
Which brings me back to our all-time favorite burger at Pause. Granted I'm now a little biased, but there was a time when I had never been there and had no expectations. The in-house ground meat makes a difference, but I think it's the consistency in cooking it that seems to set it apart. The meat is flavorful and when you ask for a medium burger, you get a medium burger (medium rare in Shawn's case). There's nothing too fancy about it, but it just tastes good. I have yet to try the burger at Gruner, but I'm sure it's going to live up to its reputation given that everything else there has for me so far.

Which restaurant makes your favorite burger? What makes it so special?

22 April 2011

Orange Jicama Salad

Pardon my absence...there is no excuse. 

This week I was over at my friend's house to cook dinner for her family, which included her mother-in-law and husband, as well as her adorable and entertaining 92 year old grandpa. I wanted something easy to bring over that I could prepare in advance and she wanted a theme meal. Since I already had a huge pot of beans cooked and another equally large pot of Spanish rice, I went with Cook's Illustrated Lighter Chicken Enchiladas. That alone would have been enough, but I wanted something to break up the richness of the meal, so I went in search of a good accompaniment and happened up this jicama salad (I got inspired by my cousin who mentioned on Facebook that she was making a jicama salad last week). I had to omit the fresh jalapeno from the main dish, but made a side one for those of us who like spice. Good thing, too, because I managed to pick out a very hot jalapeno. 


Just as refreshing and delicious as it looks. I used Cara Cara oranges (I think!), which have a beautiful red-orange flesh and really add a pop of extra color to this dish. They are less acidic, as well.

In my version, I omitted the scallions that should top it because we had one person who is sensitive to uncooked onions. I really don't see a need for them, to be honest. This salad could stand alone as a side dish or even be good with some grilled steak--like a nice flank steak. Oh boy, I can't wait for summer grilling! I also must say, this salad keeps pretty well for a couple of days, although it will lack the crunch of a freshly prepared salad. 

Orange Jicama Salad with Sweet and Spicy Peppers
from Cook's Illustrated

3 medium oranges (peel with knife to the flesh and cut into bite-sized pieces)
3 tablespoons lime juice from 2 to 3 limes
1/4 teaspoon Dijon mustard
1/2 teaspoon ground cumin , toasted in small dry skillet until fragrant, about 30 seconds
Table salt
4 tablespoons vegetable oil
1 medium jicama (about 1 pound), peeled and cut into 2-inch-long matchsticks (about 4 cups)
1 medium red bell pepper, seeded and cut into 1/8-inch-wide strips (about 1 1/2 cups)
2 medium jalapeño chiles, quartered lengthwise, seeded, then cut crosswise into 1/8-inch-thick slices
1/2 cup fresh cilantro leaves, chopped coarse
3 medium scallions, green parts sliced thin on bias

INSTRUCTIONS
1. Place orange pieces in nonreactive mesh strainer set over bowl; let stand to drain excess juice. Meanwhile, whisk lime juice, mustard, cumin, and ¼ teaspoon salt in large bowl until combined. Whisking constantly, gradually add oil.

2. Toss jícama and red bell pepper with 1/8 teaspoon salt in medium bowl until combined. Add jícama mixture, oranges, jalapeños, cilantro, and scallions to bowl with dressing and toss well to combine. Divide among individual plates, drizzle with any dressing in bowl, and serve immediately.

01 March 2011

A Very French Sunday


Continuing on the French theme....
We just made a big purchase (with help from my mom) of a brand new iMac recently since my little rebuilt computer finally bit the dust. Our good friend, Tobias, just happens to be a computer nerd genius, and came over to transfer all my files and do a bunch of other good stuff to it. Yep, I'm obviously a technical genius as well. Anyway, his wife happens to be my best-friend-fellow-foodie Eve-Maridy, so we had to turn it into a food event, not just dinner with friends.

Having remembered her disappointment that Tasty'n'Sons did not do a traditional cassoulet when we went a few weeks ago (although I'm sure it's amazing), I decided to try it out myself. I went with the Cook's Illustrated version, of course, because they had a shorter version and they are just usually reliable. They do provide a longer version that involves making your own duck confit, however, due to time and budgetary restraints, I figured this would be authentic enough.

I have another complaint Test Kitchen...you know how your Family Cookbook has those lovely prep time and total time additions in the beginning? Those would be nice on every recipe. Due to last week's coq au vin mis-read, I made sure to read this recipe multiple times before making it so I wouldn't miss an important step. Didn't seem to matter. I didn't see all the steps at the end and how much time they took. If I would've followed the recipe as written, we would've been eating at 9pm. How very French of us! But my husband is usually in bed at that hour, so I had to make some adjustments. Luckily I brined the beans overnight and they were done early. I had to remove more liquid than I wanted (it killed me throwing out that delicious broth) and I broiled the breadcrumbs so they got nice and crisp in a shorter amount of time. All in all, it turned out fabulously...good enough that Mr. Sweettooth Tobias took a second serving!
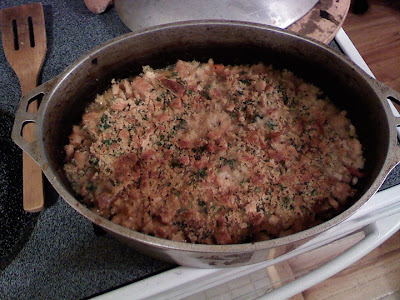
The process takes several hours, including simmering, baking with the lid, baking without the lid, baking with the breadcurmbs with the lid on, then baking with breadcrumbs with the lid off, then letting it set...

Served with a piece of pain d'epi from Pearl Bakery (thanks Emy!)
As I mentioned above, Tobias has a bit of a sweet tooth, so I had to make something fabulous for dessert. I fortunately enough made dessert before I left for my long run, so it was ready on time. Going with my French theme (and the menu off of cooksillustrated.com...ha ha), I went with a dark chocolate mousse. With all the warnings of underwhipping and overwhipping, I got a little nervous. I'm a terribly folder, too. But, I narrowly avoided all the whipping issues and they came out a huge success!

Dark chocolate mousse with homemade whipped cream and shavings of 70% cacao chocolate.
Yeah, I'd say that's about the right consistency.
How it's supposed to be done...

Cassoulet
Published November 1, 2009. From Cook's Illustrated.

Note: if you can find the French garlic sausage, I highly recommend it. It is so flavorful and really brings this dish to the next level. If you're in the Portland area, you can get both the sausage (housemade) and salt pork (frozen) at Pastaworks on Hawthorne.

Serves 8 to 10

Ingredients
Table salt
1 pound dried cannellini beans (about 2 cups), rinsed and picked over
2 medium celery ribs
1 bay leaf
4 sprigs fresh thyme
1 1/2 pounds fresh French garlic sausage (see note)
4 ounces salt pork , rinsed of excess salt
4 tablespoons vegetable oil
1 1/2 pounds pork shoulder , cut into 1-inch chunks
1 large onion , chopped fine (about 1 1/2 cups)
2 medium carrots , peeled and cut into 1/4-inch dice (about 1 cup)
4 medium cloves garlic , minced or pressed through garlic press (about 4 teaspoons)
1 tablespoon tomato paste
1/2 cup dry white wine
1 (14.5-ounce) can diced tomatoes
4 cups low-sodium chicken broth
Ground black pepper
4 large slices high-quality white sandwich bread , torn into rough pieces
1/2 cup chopped fresh parsley leaves

Instructions
1. Dissolve 2 tablespoons salt in 3 quarts cold water in large bowl or container. Add beans and soak at room temperature, 8 to 24 hours. Drain and rinse well.

2. Adjust oven rack to lower-middle position and heat oven to 300 degrees. Using kitchen twine, tie together celery, bay leaf, and thyme. Place sausage and salt pork in medium saucepan and add cold water to cover by 1 inch; bring to boil over high heat. Reduce heat to simmer and cook 5 minutes. Transfer sausages to cutting board, allow to cool slightly, then cut into 1-inch pieces. Remove salt pork from water; set aside.

3. Heat 2 tablespoons oil in large Dutch oven over medium-high heat until beginning to smoke. Add sausage pieces and brown on all sides, 8 to 12 minutes total. Transfer to medium bowl. Add pork shoulder and brown on all sides, 8 to 12 minutes total. Add onion and carrots; cook, stirring constantly, until onion is translucent, about 2 minutes. Add garlic and tomato paste and cook, stirring constantly, until fragrant, 30 seconds. Return sausage to Dutch oven; add white wine, using wooden spoon to scrape browned bits from bottom of pan. Cook until slightly reduced, about 30 seconds. Stir in tomatoes, celery bundle, and reserved salt pork.

4. Stir in broth and beans, pressing beans into even layer. If any beans are completely exposed, add up to 1 cup water to submerge (beans may still break surface of liquid). Increase heat to high and bring to simmer. Cover pot, transfer to oven, and cook until beans are tender, about 1 1/2 hours. Remove celery bundle and salt pork and discard. (Alternatively, dice salt pork and return to casserole.) Using large spoon, skim fat from surface and discard. Season with salt and pepper. Increase oven temperature to 350 degrees and bake, uncovered, 20 minutes.

5. Meanwhile, pulse bread and remaining 2 tablespoons oil in food processor until crumbs are no larger than 1/8 inch, 8 to ten 1-second pulses. Transfer to medium bowl, add parsley, and toss to combine. Season with salt and pepper.

6. Sprinkle 1/2 cup bread-crumb mixture evenly over casserole; bake, covered, 15 minutes. Remove lid and bake 15 minutes longer. Sprinkle remaining bread-crumb mixture over top of casserole and bake until topping is golden brown, about 30 minutes. Let rest 15 minutes before serving.

Dark Chocolate Mousse
Published January 1, 2006.

Makes 3 1/2 cups (6 to 8 servings)
Note: Use very good chocolate

Ingredients
8 ounces bittersweet chocolate , chopped fine
2 tablespoons cocoa powder (preferably Dutch-processed)
1 teaspoon instant espresso powder
5 tablespoons water
1 tablespoon brandy
2 large eggs, separated
1 tablespoon sugar
1/8 teaspoon table salt
1 cup heavy cream , plus 2 additional tablespoons (chilled)

Instructions
1. Melt chocolate, cocoa powder, espresso powder, water, and brandy in medium heatproof bowl set over saucepan filled with 1 inch of barely simmering water, stirring frequently until smooth. Remove from heat.

2. Whisk egg yolks, 1 1/2 teaspoons sugar, and salt in medium bowl until mixture lightens in color and thickens slightly, about 30 seconds. Pour melted chocolate into egg mixture and whisk until combined. Let cool until just warmer than room temperature, 3 to 5 minutes.

3. In clean bowl of standing mixer fitted with whisk attachment, beat egg whites at medium-low speed until frothy, 1 to 2 minutes. Add remaining 1 1/2 teaspoons sugar, increase mixer speed to medium-high, and beat until soft peaks form when whisk is lifted, about 1 minute. Detach whisk and bowl from mixer and whisk last few strokes by hand, making sure to scrape any unbeaten whites from bottom of bowl. Using whisk, stir about one-quarter of beaten egg whites into chocolate mixture to lighten it; gently fold in remaining egg whites with rubber spatula until a few white streaks remain.

4. In now-empty bowl, whip heavy cream at medium speed until it begins to thicken, about 30 seconds. Increase speed to high and whip until soft peaks form when whisk is lifted, about 15 seconds more. Using rubber spatula, fold whipped cream into mousse until no white streaks remain. Spoon into 6 to 8 individual serving dishes or goblets. Cover with plastic wrap and refrigerate until set and firm, at least 2 hours. (The mousse may be covered and refrigerated for up to 24 hours.)

23 February 2011

Coq Au Vin

My mom came to visit this weekend and since she and Shawn had Monday off (I did not), we decided to make a nice Sunday dinner in honor of her visit. As you may have noticed, I like to shop the sales at New Seasons. Whole chicken legs were on sale and after some searching through Cook's Illustrated, I settled on a classic recipe I'd never attempted--coq au vin. Although there is another recipe on the cooksillustrated.com website for a so-called modern version that cuts the time in half, it used boneless, skinless chicken thighs--much more expensive than the legs. 

Serve over egg noodles--this is supposed to serve only 4. Um...4 giants?
After spending 2 1/2 hours in the kitchen Sunday afternoon and picking out chicken skin from the dish, I can understand the updated recipe. I also made a seemingly large error right in the beginning. The instructions said to simmer the wine and chicken broth together until it is reduced to 4 cups. Well, earlier in the same step, it says to generously season the chicken legs. Set aside. See, those two little words get lost in the page of instructions that went along with the recipe! Cook's Illustrated--would it kill you to add a step? This is not the first time I've missed something like that. I thought it was odd to be boiling the chicken, but it was my first time making it and I was trying to install Office onto our new iMac (eeee!) at the same time. Lesson learned... 

Shawn and mom waiting for me to stop taking pictures and dish it out already. Notice the beautiful tablecloth my aunt sent us for our wedding (made by my grandmother).

Those French really know how to cook...just keep adding butter. Look how shiny!

Coq Au Vin
If you have the time to blanch and skin them, fresh pearl onions are terrific. Simply cut an “x” in the root end, blanch them in boiling water for 30 seconds, remove them with a slotted spoon, and refresh them in a bowl of ice water. Then slice off the very tip of the roots with a paring knife and squeeze the onions gently from the blossom end. They will pop right out of their skins.

Ingredients
4 chicken leg quarters (about 3 pounds), carefully trimmed of all fat, cleaned, dried, and thighs and drumsticks separated
1 bottle fruity, smooth, medium-bodied red wine (750ML), such as Oregon Pinot Noir, Zinfandel, or a light Rhone valley wine
2 1/2 cups chicken stock or low-sodium canned chicken broth
6 ounces bacon (preferably thick-cut), cut crosswise into 1/4-inch pieces
6 - 7 tablespoons unsalted butter , at room temperature
1 large carrot , roughly chopped
1 large onion , roughly chopped
2 medium shallots , peeled and quartered
2 medium cloves garlic , skin on and smashed
1 teaspoon dried thyme
10 parsley stems
1 bay leaf
1 1/2 teaspoons tomato paste
24 frozen pearl onions (evenly sized), thawed, or fresh pearl onions
1/2 pound white mushrooms (small), washed and halved if medium sized, quartered if large
2 - 3 tablespoons unbleached all-purpose flour
2 tablespoons minced fresh parsley leaves

Instructions
1. Generously sprinkle chicken pieces with salt and ground black pepper; set aside. Bring red wine and chicken stock to boil in large, heavy saucepan; reduce heat to medium-high and simmer until reduced to about 4 cups, about 20 minutes.

2. Meanwhile, fry bacon in large Dutch oven or deep, heavy-bottomed sauté pan over medium heat until fat has rendered and bacon is golden brown, about 5 minutes. Remove bacon with slotted spoon to paper towel-lined plate to drain; set aside. Heat 1 tablespoon butter with rendered bacon fat; add carrot, onion, shallots, and garlic and sauté until lightly browned, 10 to 15 minutes. Following illustration 1 below, press vegetables against side of pan with slotted spoon to squeeze out as much fat as possible; transfer vegetables to pan with reduced wine mixture (off heat) and discard all but 1 tablespoon fat from Dutch oven or sauté pan.

3. Return Dutch oven or sauté pan to burner over medium-high heat and add another 1 tablespoon butter. When butter is melted, add chicken (in batches if necessary to avoid overcrowding) and cook until well browned all over, turning once or twice during cooking, 12 to 16 minutes. Remove chicken to a plate; set aside. Pour off all fat from Dutch oven or sauté pan; return to heat and add wine-vegetable mixture. Bring to boil, scraping up browned bits from bottom of pan with wooden spoon (see illustration 2, below). Add browned chicken, bouquet garni (thyme, parsley, and bay leaf tied together), and tomato paste to boiling wine mixture; return to boil, then reduce heat to low and simmer gently, partially covered. Turn chicken once during cooking, until tender and infused with wine flavor, 45 to 60 minutes.

4. While chicken and sauce are cooking, heat another 2 tablespoons butter in medium skillet over medium-low heat. Add pearl onions and cook, stirring occasionally and reducing heat if butter starts to brown too fast, until lightly browned and almost cooked through, 5 to 8 minutes. Add mushrooms, season with salt, cover, increase heat to medium, and cook until mushrooms release their liquid, about 5 minutes. Remove cover, increase heat to high, and boil until liquid evaporates and onions and mushrooms are golden brown, 2 to 3 minutes more. Transfer onions and mushrooms to plate with bacon; set aside.

5. When the chicken is cooked, transfer to serving bowl or platter; cover with aluminum foil to keep warm. Following illustration 3, below, strain sauce through fine mesh sieve set over large measuring cup, pressing on solids with wooden spoon to release as much liquid as possible; sauce should measure 2 to 3 cups. Return sauce to pan; skim as much fat as possible off surface. Counting 1 tablespoon each of butter and flour for each cup of sauce, mash 2 to 3 tablespoons each butter and flour in small bowl or plate to make a beurre manié, as shown in illustration 4. Bring sauce to boil and whisk in beurre manié until smooth. Add reserved chicken, bacon, onions and mushrooms; adjust seasoning with salt and ground black pepper to taste, reduce heat to medium-low and simmer very gently to warm through and blend flavors, about 5 minutes. Check seasoning one more time and adjust with additional salt and ground black pepper if necessary; add parsley. Transfer chicken to serving platter; pour sauce over chicken. Serve immediately.

17 February 2011

Thai Coconut Chicken Soup

What's better for a cold, winter night than soup? I've been getting a little tired of the old standby soups and have had a couple of cans of coconut milk sitting in the cupboard for a while, so I went in search of a coconut milk-based soup. I found one on Cooksillustrated.com, but it felt like too much work (sorry Test Kitchen, but you didn't feel worth it this time). After a little searching on Epicurious, I found something easy and that didn't require a lot of extra ingredients. The serrano chiles also helped clear out any remaining ickiness from my cold.

Makes great leftovers! If you use noodles, be careful that they don't absorb too much liquid
(like rice noodles) or you'll end up with mush if you try to use as leftovers.
 The only unfortunate part about this recipe is that it seems to have left out an ingredient....like say 75% of the liquid... My gut reaction was of disbelief that the only liquid was the coconut milk (14 oz.) and the fish sauce (5 T). That seems pretty thick and not enough to cover the chicken. Turned out I wasn't the only one with that feeling--there were plenty of reviews recommending the addition of chicken broth. I didn't have any chicken broth on hand, but did have some "chicken" broth powder that I mixed up with a quart of water. Definitely made a difference. I also reduced the fish sauce, on other people's recommendations, to 3 T--didn't want it to overwhelm the coconut flavor. It's also very important that you do a good job crushing the lemongrass and make sure to make big enough slices of ginger that you can fish them out before serving. Shawn wasn't terribly happy to chew on a big chunk of ginger.

Coconut Chicken Soup
Epicurious (with revisions)
  • 1 quart low sodium chicken broth
  • One 14-ounce can coconut milk
  • 6 thin slices fresh galangal or 4 slices fresh ginger
  • 2 lemongrass stalks, tough outer portion removed tender portion only, chopped and crushed in mortar
  • 5 fresh kaffir lime leaves, torn inhalf, or 1 tablespoon grated lime zest
  • 3/4 pound boneless and skinless chicken breast, thinly sliced
  • 3 tablespoons Thai or Vietnamese fish sauce
  • 2 tablespoons palm sugar or granulated sugar
  • 1/2 cup fresh lime juice
  • 1 teaspoon Thai red curry paste
  • 1/4 cup coarsely chopped cilantro (fresh coriander)
  • 25 fresh green bird's-eye chiles or 15 fresh green Thai chiles or 8 green serrano chiles, crushed in a mortar with the pestle
1. In a large pot, combine 1 cup of the coconut milk with the galangal, lemongrass, and lime zest and bring to a boil. Add the chicken, fish sauce, and sugar, reduce the heat to medium, and simmer until the chicken is white and firm, about 4 minutes. Add the remaining coconut milk and heat to just below boiling, about 3 minutes. Stir in red curry paste and noodles, if using.

2. Divide the lime juice and a touch more curry paste into individual serving bowls and ladle the soup over them. Garnish each bowl with the cilantro and crushed chile peppers. Serve immediately.

This soup is open to interpretation given that it's not really a tom kha gai recipe. I added cellophane noodles since we had half a package in the cupboard; other reviews recommended adding shiitake mushrooms. Overall, it was a very satisfying meal and got me out of my soup funk.

03 February 2011

Sea Salt Chocolate Chip Cookies

This weekend was our annual group trip to Mt. Hood. We had a record number this year of 10 people and a shorter weekend than usual, so meals were divided up further. We tacked on to Michael's delicious dinner of lamb and polenta lasagna (weighing in at about 8 lbs, not counting the pan!) and made caesar salad, bread, and dessert. But who cares about salad?? Let's get on to the dessert.

Since I knew we'd be out in the cold, snowy weather (ha ha...right), I thought we needed a warm dessert. And what's better than a warm chocolate chip cookie? So I went scouring the internet for a great chocolate chip and sea salt recipe and found an article from the NY Times about the perfect chocolate chip cookie. The article is actually pretty interesting if you're into that sort of thing, so I recommend reading it if you have time. I found a lot of other salted chocolate chip cookie recipes that were thin and crisp--they have their place too--but for a heaping scoop of ice cream and some Holy Kakow, you need a big, soft cookie.


Chocolate Chip Cookies
Published: July 9, 2008 in NY Times
Adapted from Jacques Torres
Time: 45 minutes (for 1 6-cookie batch), plus at least 24 hours’ chilling

2 cups minus 2 tablespoons (8 1/2 ounces) cake flour*
1 2/3 cups (8 1/2 ounces) bread flour
1 1/4 teaspoons baking soda
1 1/2 teaspoons baking powder
1 1/2 teaspoons coarse salt
2 1/2 sticks (1 1/4 cups) unsalted butter
1 1/4 cups (10 ounces) light brown sugar
1 cup plus 2 tablespoons (8 ounces) granulated sugar
2 large eggs
2 teaspoons natural vanilla extract
1 1/4 pounds bittersweet chocolate disks or fèves, at least 60 percent cacao content (Carmel's note: did not use disks and it turned out fine...the cacao content is VERY important, though)
Sea salt (Carmel's 2nd note: I bought a small amount of grey sea salt from the bulk spices section of New Seasons--economical and delicious!)

1. Sift flours, baking soda, baking powder and salt into a bowl. Set aside.

2. Using a mixer fitted with paddle attachment,** cream butter and sugars together until very light, about 5 minutes. Add eggs, one at a time, mixing well after each addition. Stir in the vanilla. Reduce speed to low, add dry ingredients and mix until just combined, 5 to 10 seconds. Drop chocolate pieces in and incorporate them without breaking them. Press plastic wrap against dough and refrigerate for 24 to 36 hours. Dough may be used in batches, and can be refrigerated for up to 72 hours.

3. When ready to bake, preheat oven to 350 degrees. Line a baking sheet with parchment paper or a nonstick baking mat. Set aside.

4. Scoop 6 3 1/2-ounce mounds of dough (the size of generous golf balls) onto baking sheet, making sure to turn horizontally any chocolate pieces that are poking up; it will make for a more attractive cookie. Sprinkle lightly with sea salt and bake until golden brown but still soft, 18 to 20 minutes. Transfer sheet to a wire rack for 10 minutes, then slip cookies onto another rack to cool a bit more. Repeat with remaining dough, or reserve dough, refrigerated, for baking remaining batches the next day. Eat warm, with a big napkin.

Yield: 1 1/2 dozen 5-inch cookies.

*Given the very specific measurements of flour in this recipe, I highly recommend using a food scale if you have one.
**I don't have a paddle attachment for my (ahem) economical stand mixer, but a hand mixer works just fine. But be patient as creaming the sugars and butter may take a few extra minutes.